7.9 KiB
Provider Specific Configuration
This plugin has been tested to work against various providers, though not all providers provide support for all of this plugins' features.
TOC / Tested Providers:
This section is broken into providers that support Role-Based Access Control (RBAC), and those that do not
Providers that support RBAC
No RBAC Support
- ✅ Google OIDC
- ❗ Usernames are numeric
- ❗ Requires disabling validating OpenID endpoints
General Options, when RBAC is supported
For any provider that supports RBAC, we can configure it as we see fit:
Enabled: true
EnableAuthorization: true
EnableAllFolders: true
EnabledFolders: []
Roles: ["jellyfin_user"]
AdminRoles: ["jellyfin_admin"]
EnableFolderRoles: false
FolderRoleMapping: []
Authelia
Authelia is simple to configure, and RBAC is straightforward.
Authelia's Config
Below is the identity_providers section of an Authelia config:
Authelia v4.38 and above
identity_providers:
  oidc:
    # hmac secret and private key given by env variables
    clients:
      - client_id: jellyfin
        client_name: My media server
        # Client secret should be randomly generated
        client_secret: <redacted>
        token_endpoint_auth_method: client_secret_post
        authorization_policy: one_factor
        redirect_uris:
          - https://jellyfin.example.com/sso/OID/redirect/authelia
Authelia v4.37 and below
identity_providers:
  oidc:
    # hmac secret and private key given by env variables
    clients:
      - id: jellyfin
        description: My media server
        # Client secret should be randomly generated
        secret: <redacted>
        authorization_policy: one_factor
        redirect_uris:
          - https://jellyfin.example.com/sso/OID/redirect/authelia
Jellyfin's Config
On Jellyfin's end, we need to configure an Authelia provider as follows:
In order to test group membership, we need to request Authelia's groups OIDC scope, which we will use to check user roles.
authelia:
  OidEndpoint: https://authelia.example.com
  OidClientId: jellyfin
  OidSecret: <redacted>
  RoleClaim: groups
  OidScopes: ["groups"]
authentik
To begin with, we must set up an OIDC provider + application in authentik. Refer to the official documentation for detailed instruction.
authentik's Config
authentik supports RBAC, but is slightly more complicated to configure than Authelia, as we need to configure a custom scope binding to include in the OIDC response.
To do this, we:
-
create a Custom Property Mapping

-
Create a Scope Mapping
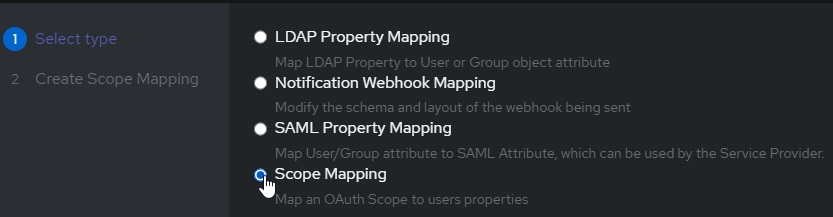
-
Assign the following attributes:
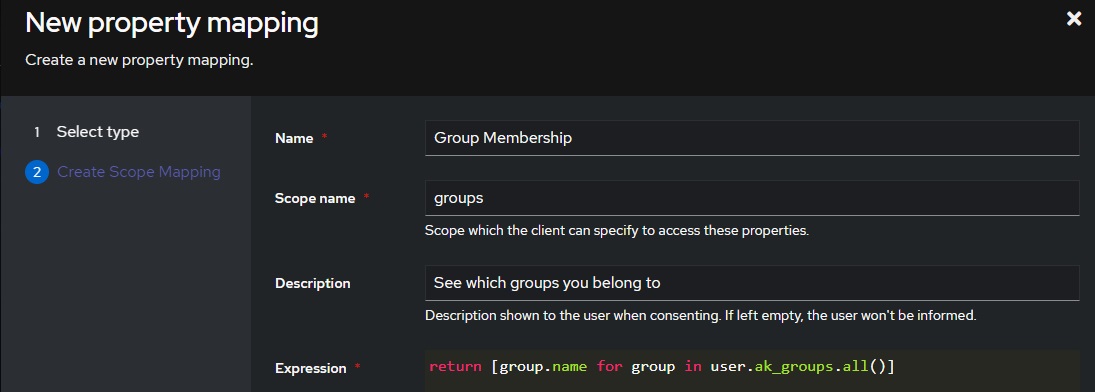
# A nice, human readable name name: Group Membership # The name of the scope a client must request to get access to a user's groups Scope Name: groups # A description of what is being requested to show to a user Description: See Which Groups you belong to -
For the Expression field, use the following code:
return [group.name for group in user.ak_groups.all()]
Now we can add this property mapping to authentik's Jellyfin OAuth provider:
-
Navigate to
Applications/providers
-
Edit / Update your Jellyfin OAuth provider
-
Verify your "Redirect URIs/Origins (RegEx)" follows the format:
https://domain.tld/sso/OID/redirect/Authentik. -
Under "Advanced Protocol Settings", add the Group Membership Scope

Jellyfin's Config
On Jellyfin's end, we need to configure an authentik provider as follows:
In order to test group membership, we need to request authentik's OIDC scope groups, which we will use to check user roles.
authentik:
  OidEndpoint: https://authentik.example.com/application/o/jellyfin
  OidClientId: <same-as-in-authentik>
  OidSecret: <redacted>
  RoleClaim: groups
  OidScopes: ["groups"]
If you recieve the error Error processing request. from Jellyfin when attempting to login and the Jellyfin logs show Error loading discovery document: Endpoint belongs to different authority try setting Do not validate endpoints in the plugin settings.
Keycloak OIDC
Keycloak in general is a little more complicated than other providers. Ensure that you have a realm created and have some usable users.
Keycloak's Config
Create a new Keycloak openid-connect application. Set the root URL to your Jellyfin URL (ie https://myjellyfin.example.com)
Ensure that the following configuration options are set:
- Access Type: Confidential
- Standard Flow Enabled
- Redirect URI: https://myjellyfin.example.com/sso/OID/redirect/PROVIDER_NAME
- Redirect URI (for Android app): org.jellyfin.mobile://login-callback
- Base URL: https://myjellyfin.example.com
Press the "Save" button at the bottom of the page and open the "Credentials" tab. Note down the secret.
For adding groups and RBAC, go to the "mappers" tab, press "Add Builtin", and select either "Groups", "Realm Roles", or "Client Roles", depending on the role system you are planning on using. Once the mapper is added, edit the mapper and ensure that you note down the Token Claim Name as well as enable all four toggles: "Multivalued", "Add to ID token", "Add to access token", and "Add to userinfo" are enabled.
Note that if you are using the template for the "Client Roles" mapper, the default token claim name has ${client_id} in it. When noting down this value, make sure you note down the actual Client ID (which should be written above).
Jellyfin's Config
On Jellyfin's side, we need to configure a Keycloak provider as follows:
keycloak:
  OidEndpoint: https://keycloak.example.com/realms/<realm>
  OidClientId: <same-as-in-keycloak>
  OidSecret: <redacted>
  RoleClaim: <same-as-token-claim-name>
Keycloak SAML
Keycloak with SAML is very similar to OpenID. Again, Keycloak in general is a little more complicated than other providers. Ensure that you have a realm created and have some usable users.
Keycloak's Config
Create a new Keycloak saml application. Set the root URL to your Jellyfin URL (ie https://myjellyfin.example.com)
Ensure that the following configuration options are set:
- Sign Documents on
- Sign Assertions off
- Client Signature Required off
- Redirect URI: https://myjellyfin.example.com/sso/SAML/start/PROVIDER_NAME
- Base URL: https://myjellyfin.example.com
- Master SAML processing URL: https://myjellyfin.example.com/sso/SAML/start/PROVIDER_NAME
Press the "Save" button at the bottom of the page.
For adding groups and RBAC, go to the "mappers" tab, press "Add Builtin", and select either "Groups", "Realm Roles", or "Client Roles", depending on the role system you are planning on using. Once the mapper is added, edit the mapper and ensure that you note down the Token Claim Name as well as enable all four toggles: "Multivalued", "Add to ID token", "Add to access token", and "Add to userinfo" are enabled.
Note that if you are using the template for the "Client Roles" mapper, the default token claim name has ${client_id} in it. When noting down this value, make sure you note down the actual Client ID (which should be written above).
Finally, download the certificate. Open the "Installation" tab, select "Mod Auth Mellon files", and download the zip. Extract the zip file, and open the idp-metadata.xml file. Note down the contents of the X509Certificate value.
Jellyfin's Config
keycloak:
  SamlEndpoint: https://keycloak.example.com/realms/<realm>/protocol/saml
  SamlClientId: <same-as-in-keycloak>
  SamlCertificate: <copied-from-xml-file>