|
|
||
|---|---|---|
| .devcontainer | ||
| .github | ||
| .vscode | ||
| assets | ||
| build | ||
| deployments/mosquitto/config | ||
| init | ||
| internal | ||
| pkg/linux | ||
| .gitignore | ||
| .golangci.yaml | ||
| .markdownlint.json | ||
| .nfpm.yaml | ||
| .pre-commit-config.yaml | ||
| .release-please-manifest.json | ||
| ARCHITECTURE.md | ||
| BREAKING_CHANGES.md | ||
| CHANGELOG.md | ||
| CODE_OF_CONDUCT.md | ||
| CONTRIBUTING.md | ||
| Dockerfile | ||
| LICENSE | ||
| README.md | ||
| SECURITY.md | ||
| codecov.yml | ||
| cosign.key | ||
| cosign.pub | ||
| go.mod | ||
| go.sum | ||
| main.go | ||
| osv-scanner.toml | ||
| release-please-config.json | ||
README.md

Go Hass Agent
A Home Assistant, native app integration for desktop/laptop devices.


Documentation · Report Bug · Request Feature
📔 Table of Contents
- 📔 Table of Contents
- 🌟 About the Project
- 🎯 Features
- 🤔 Use-cases
- 📈🕹️📢 List of Sensors/Controls/Events (by Operating System)
- 🧰 Getting Started
- 👐🏻 Usage
- ⚙️ Building/Compiling Manually
- 👋 Contributing
- 🧭 Roadmap
- ❔ FAQ
- Can I change the units of the sensor?
- Can I disable some sensors?
- The GUI windows are too small/too big. How can I change the size?
- What is the resource (CPU, memory) usage of the agent?
- I've updated the agent and now I've got a bunch of duplicate/removed/disabled sensors?
- Can I reset the agent (start from new)?
- Can (or does) the agent run as root or with privileges?
- Can the agent run in an MQTT-only mode?
- (Linux) I want to run the agent on a server, as a service, without a GUI. Can I do this?
- (Linux) Why do the disk rate sensors report a non-zero value while the IO operations in progress sensor is zero?
- (Linux) What does the value of the Firmware Security sensor mean?
- (Linux) Some of the hardware sensors are reporting incorrect values?
- 🤝 Acknowledgements
- 🧑⚖️ License
🌟 About the Project
Go Hass Agent is an application to expose sensors, controls, and events from a device to Home Assistant. You can think of it as something similar to the Home Assistant companion app for mobile devices, but for your desktop, server, Raspberry Pi, Arduino, toaster, whatever. If it can run Go and Linux, it can run Go Hass Agent!
Out of the box, Go Hass Agent will report lots of details about the system it is running on. You can extend it with additional sensors and controls by hooking it up to MQTT. You can extend it even further with your own custom sensors and controls with scripts/programs.
You can then use these sensors, controls, or events in any automations and dashboards, just like the companion app or any other “thing” you've added into Home Assistant.
🎯 Features
- Sensors: Expose a number of sensor entities to Home Assistant, for displaying in dashboards, using in automations or any other aspects your Home Assistant platform.
- Custom Sensors via Scripts: All platforms can also utilize scripts/executables to create custom sensors. See Script Sensors.
- Controls and additional sensors via MQTT: Where Home Assistant is connected to MQTT, Go Hass Agent can add some additional sensors/controls for various system features. A selection of device controls are provided by default, and you can configure additional controls to execute D-Bus commands or scripts/executables. See Control via MQTT.
- Events: Go Hass Agent will send a few events when certain things happen on the device running the agent (for example, user logins/logouts). You can listen for these events and react on them in Home Assistant automations.
🤔 Use-cases
As examples of some of the things that can be done with the data published by this app:
- Change your lighting depending on:
- What active/running apps are on your laptop/desktop. For example, you could set your lights dim or activate a scene when you are gaming.
- Whether your screen is locked or the device is shutdown/suspended.
- Set up automations to run when you log in or out of your machine.
- With your laptop plugged into a smart plug that is also controlled by Home Assistant, turn the smart plug on/off based on the battery charge. This can force a full charge/discharge cycle of the battery, extending its life over leaving it constantly charged.
- Like on mobile devices, create automations based on the location of your laptop running this app.
- Monitor network the data transfer amount from the device, useful where network data might be capped.
- Monitor CPU load, disk usage and any temperature sensors emitted from the device.
- Receive notifications from Home Assistant on your desktop/laptop. Potentially based on or utilizing any of the data above.
📈🕹️📢 List of Sensors/Controls/Events (by Operating System)
[!NOTE]
The following list shows all potential sensors the agent can report. In some cases, the actual sensors reported may be less due to lack of support in the system configuration or missing hardware.
🐧 Linux
📈 Sensors
- App Details:
- Active App (currently active (focused) application) and Running Apps (count of all running applications). Updated when active app or number of apps changes.
- Via D-Bus (requires XDG Desktop Portal Support support).
- Preferences:
[sensors.desktop.app].
- Desktop Settings:
- Accent Color (the hex code representing the accent color of the desktop environment in use).
- Theme Type (whether a dark or light desktop theme is detected).
- Updated when (theme or color) changes.
- Via D-Bus (requires XDG Desktop Portal Support support).
- Preferences:
[sensors.desktop.preferences].
- Media:
- MPRIS Player State Show the current state of any MPRIS compatible player.
- Requires a player with MPRIS support.
- Preferences:
[sensors.media.mpris].
- MPRIS Player State Show the current state of any MPRIS compatible player.
- Connected Battery Details:
- Battery Type (the type of battery, e.g., UPS, line power). Updated on battery add/remove.
- Battery Temp (battery temperature). Updated when the temperature changes.
- Battery Power (the battery current power draw, in W). Attributes: Voltage (V), Energy consumption (kWh). Updated when power draw changes.
- Battery Level/Percentage (either a textual representation of the level or a percentage, depending on battery support). Updated when level changes.
- Battery State (the current battery state, e.g., charging/discharging). Updated When state changes.
- All battery sensors require D-Bus and UPower support.
- Preferences:
[sensors.batteries].
- Memory Stats:
- Memory Total (total memory on the system, in B).
- Memory Available (current memory available/free, in B).
- Memory Used (current memory usage, both in B and %).
- If swap is enabled, there will be similar sensors for swap.
- Sourced via ProcFS. Updated ~every minute.
- Preferences:
[sensors.memory.usage].
- Disk:
- Disk Usage (in %) per disk/mount.
- Attributes: File system type, bytes/inode total/free/used.
- Sourced via ProcFS. Updated ~every minute.
- Total Read/Writes (count) per disk.
- Attributes include total milliseconds/sectors spent.
- Read/Write Rate (in KB/s) per disk.
- Both sourced via SysFS. Updated ~every 5 seconds.
- IO Operations in Progress per disk.
- Sourced via SysFS. Updated ~every 5 seconds.
- Preferences:
[sensors.disk.*rates*](usagefor usage orratesfor all others).
- Disk Usage (in %) per disk/mount.
- Networking:
- Connection State (connected/disconnected/activating/deactivating) per
connection. Updated when state changes. Requires D-Bus and NetworkManager.
- Attributes: IP addresses and networks.
- Preferences:
[sensors.network.connections].
- Connected Wi-Fi Network Details (requires D-Bus and NetworkManager.):
- SSID (the SSID of the Wi-Fi network). Updated when SSID changes.
- Frequency (the frequency band of the Wi-Fi network, in Hz). Updated when frequency changes.
- Speed (the network speed of the Wi-Fi network, in Mbps). Updated when speed changes.
- Strength (the strength of the signal of the Wi-Fi network, in dB). Updated when strength changes.
- BSSID (the BSSID of the Wi-Fi network). Updated when BSSID changes.
- Preferences:
[sensors.network.connections].
- Device/Link State
- Via Netlink.
- Preferences:
[sensors.network.links].
- Bytes Received/Sent (in B). Updated ~every 5s.
- Per network device/link and total.
- Via Netlink.
- Preferences:
[sensors.network.rates].
- Bytes Received/Sent Rate (transfer rate, in B/s). Updated ~every 5
seconds. Via ProcFS.
- Per network device/link and total.
- Via Netlink.
- Preferences:
[sensors.network.rates].
- You can ignore some devices from generating sensors, see the individual preferences sections above.
- Connection State (connected/disconnected/activating/deactivating) per
connection. Updated when state changes. Requires D-Bus and NetworkManager.
- CPU:
- Load Average (1/5/15 min). Updated ~every 1 minute. Via ProcFS.
- Preferences:
[sensors.cpu.load_averages].
- Preferences:
- CPU Usage (in %). Both total (all-cores) and per-core. Updated ~every 10
seconds. Via ProcFS.
- Attributes include breakdown of CPU time per state (i.e., user, idle, servicing interrupts, etc.).
- Preferences:
[sensors.cpu.usage].
- Load Average (1/5/15 min). Updated ~every 1 minute. Via ProcFS.
-
- CPU Core Frequency (in Hz). Per-core. Updated ~every 10 seconds. Via
ProcFS.
- Attributes include current driver and governor in use.
- Preferences:
[sensors.cpu.frequencies].
- CPU Core Frequency (in Hz). Per-core. Updated ~every 10 seconds. Via
ProcFS.
- Power Related Details:
- Power Profile (the current power profile as set by the
power-profiles-daemon). Updated when profile changes.
- Via D-Bus (requires power-profiles-daemon).
- Preferences:
[sensors.power.profile].
- Screen Lock State (current state of screen lock). Updated when screen lock
changes.
- Via D-Bus. Requires
xscreensaverorsystemd-logindsupport. - Preferences:
[sensors.power.screen_lock].
- Via D-Bus. Requires
- Power State (power state of device, e.g., suspended, powered on/off).
Updated when power state changes.
- Via D-Bus. Requires
systemd-logind. - Preferences:
[sensors.power.state].
- Via D-Bus. Requires
- Power Profile (the current power profile as set by the
power-profiles-daemon). Updated when profile changes.
- Various System Details:
- Boot Time (date/Time of last system boot). Via ProcFS.
- *Uptime. Updated ~every 15 minutes. Via ProcFS.
- Kernel Version (version of the currently running kernel). Updated on agent start. Via ProcFS.
- Vulnerabilities:
- Firmware Security the Host Security ID of the device running Go Hass Agent.
- Attributes show details for each HSI attribute.
- Via D-Bus. Requires
fwupdrunning on the system.
- CPU Vulnerabilities whether any CPU vulnerabilities have been detected by the kernel and exploitable/unmitigated.
- Attributes show the status of each vulnerability detected.
- Via ProcFS.
- Firmware Security the Host Security ID of the device running Go Hass Agent.
- Distribution Details:
- Distribution Name (name of the running distribution, e.g., Fedora, Ubuntu).
- Distribution Version (version of the running distribution).
- Both updated on agent start. Via ProcFS.
- Preferences (for all the above system details sensors):
[sensors.system.info]. - Current Users (count of users with active sessions on the system). Updated
when any session changes.
- Attributes: List of usernames | When user count changes.
- Via D-Bus. Requires
systemd-logind. - Preferences:
[sensors.system.users].
- ABRT Problems (count of any problems logged to the ABRT daemon). Updated
~every 15 minutes.
- Attributes: extracted problem details.
- Requires ABRT.
- Preferences:
[sensors.system.abrt_problems].
- Hardware Sensors:
- Any temp, fan, power and other hardware sensors, including associated alarms. Updated ~every 1 minute.
- Extracted from the
/sys/class/hwmonfile system. - Preferences:
[sensors.system.hardware_sensors].
🕹️ Controls
[!NOTE]
Only available when configured with MQTT
- Media Controls:
- Volume Control: Adjust the volume on the default audio output device.
- Volume Mute: Mute/Unmute the default audio output device.
- Webcam Control: Start/stop a webcam and view the video in Home Assistant.
- Requires a webcam that is exposed via V4L2 (VideoForLinux2).
- Preferences :
[controls.media.*](audioorvideo).
- Power Controls:
- Lock/Unlock Screen/Screensaver: Locks/unlocks the session for the user
running Go Hass Agent.
- Preferences :
[controls.power.screen_lock_controls].
- Preferences :
- Suspend: (instantly) suspend (the system state saved to RAM and the CPU turned off) the device running Go Hass Agent.
- Hibernate: (instantly) hibernate (the system state saved to disk and the machine powered down) the device running Go Hass Agent.
- Power Off: (instantly) power off the device running Go Hass Agent.
- Reboot: (instantly) reboot the device running Go Hass Agent.
- Power controls require a system configured with
systemd-logind(and D-Bus) support. - Preferences (for suspend/hibernate/power off/reboot controls):
[controls.power.power_controls]. - Inhibit Lock: stop the system from being able to shutdown or suspend.
- Preferences:
[controls.power.inhibit_controls].
- Preferences:
- Lock/Unlock Screen/Screensaver: Locks/unlocks the session for the user
running Go Hass Agent.
- Run arbitrary D-Bus commands: see Custom D-Bus Controls.
- Preferences:
[controls.system.dbus_commands].
- Preferences:
📢 Events
-
User sessions (login/logout) events.
-
Requires a system configured with
systemd-logind. -
Event structures:
event_type: session_started # or session_stopped data: desktop: "" # blank or a desktop name, like KDE. remote: true # true if remote (i.e., ssh) login. remote_host: "::1" # remote host or blank. remote_user: "" # remote user or blank. service: "" # blank or the service that handled the action (e.g., ssh). type: "tty" # blank or type of session. user: myuser # username. -
Preferences:
[sensors.system.users].
-
-
Out Of Memory (OOM) events.
-
Requires a system configured with
systemd-oomdenabled. -
Event structure:
event_type: oom_event data: process: systoomd_swap_test # process that was killed by systemd-oomd. pid: 909764 # pid of process. -
Preferences:
[sensors.memory.oom].
-
All Operating Systems
Sensors:
- Go Hass Agent Version: Updated on agent start.
- Preferences:
[sensors.agent.version].
- Preferences:
- External IP Addresses: All external IP addresses (IPv4/6) of the device
running the agent.
- Preferences:
[sensors.agent.external_ip].
- Preferences:
- Connection Latency: Total connection time (in milliseconds) to connect to
Home Assistant from the device running Go Hass Agent. Additional times shown
as attributes.
- Preferences:
[sensors.agent.connection_latency].
- Preferences:
🧰 Getting Started
🤝 Compatibility
Currently, only Linux is supported. Though the code is designed to be extensible to other operating systems. See development information in the docs for details on how to extend for other operating systems.
🔽 Installation
📦 Packages
Head over to the releases page and download the appropriate package for your operating system and/or distribution:
- Fedora: use the
.rpm. - Ubuntu/Debian: use the
.deb. - Arch: use the
.tar.zst.
Packages (and binaries) are available for amd64, arm (v6 and v7) and arm64 architectures.
For distributions not listed above, you can try the binary, or build it yourself from source (see development docs). Note that while Go is known for statically compiled binaries that “run anywhere”, the Fyne UI toolkit used by Go Hass Agent makes use of shared libraries that may need to be installed as well.
Package signatures can be verified with
cosign. To verify a package, you'll need
to download cosign.pub public key and the .sig file (downloaded from
releases) that matches the
package you want to verify. To verify a package, a command similar to the
following for the rpm package can be used:
cosign verify-blob --key cosign.pub --signature go-hass-agent-*.rpm.sig go-hass-agent-*.rpm
🚢 Container
Container images are available on ghcr.io. Note that it is recommended to use an image tagged with the latest release version over the latest container image, which might be unstable.
🗒️ Versioning
This project follows semantic versioning. Given a version
number MAJOR.MINOR.PATCH, the gist of it is:
- A
MAJORnumber change means there breaking changes from the previous release that may require manual intervention before/after upgrading. - A
MINORnumber change means significant changes and new features have been added, but not breaking changes. - A
PATCHnumber change indicate minor changes and bug fixes.
👐🏻 Usage
Go Hass Agent runs as a tray icon by default. It is operating system, distribution and desktop-environment agnostic and should manifest itself in any tray of any desktop environment.
🚩 First-run
On first-run, Go Hass Agent will display a window where you will need to enter some details, so it can register itself with a Home Assistant instance to be able to report sensors and receive notifications.
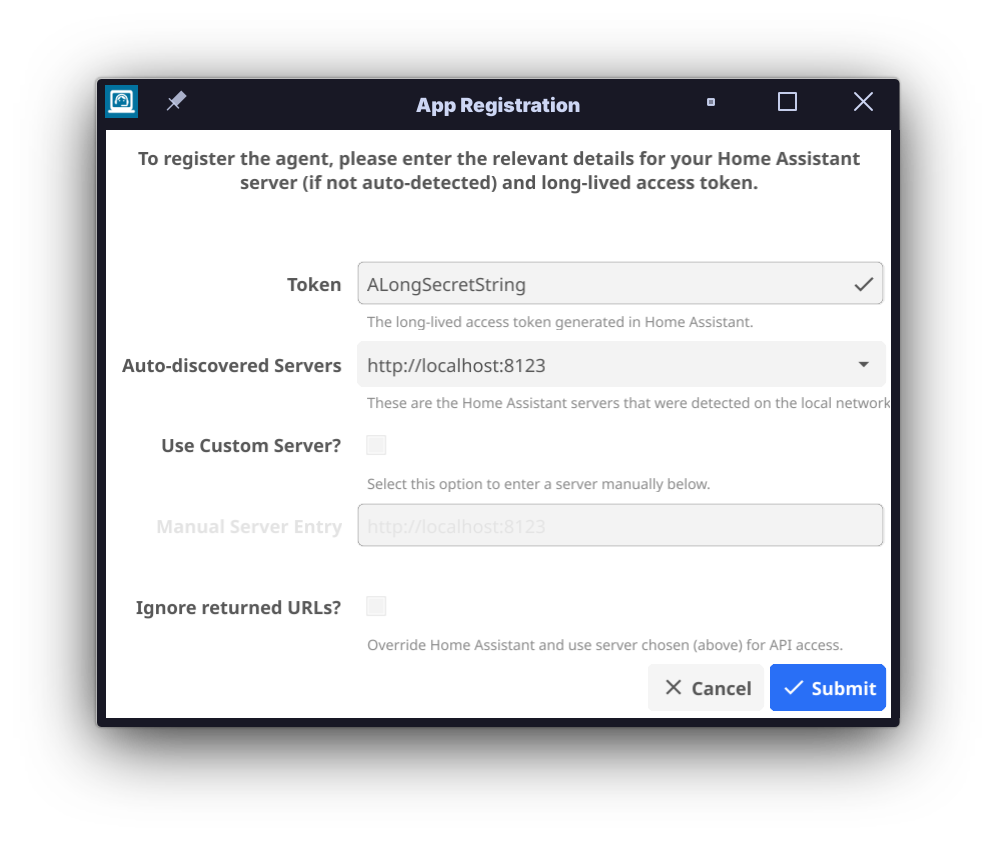
You will need:
- A long-lived access token. You can generate one on your account profile page.
- The web address (URL) on which a Home Assistant instance can be found.
- Go Hass Agent will try to auto-detect this for you, and you can select it in the Auto-discovered servers list. Otherwise, you will need to select Use Custom Server?, and enter the details manually in Manual Server Entry.
When you have entered all the details, click Submit and the agent should start running and reporting sensors to the Home Assistant instance.
👻 Running “Headless”
Go Hass Agent will automatically detect if there is no GUI available and run in a “headless” mode with no UI. Registration will need to be completed manually as a first step in such environments.
You can register Go Hass Agent on the command-line with by running:
go-hass-agent --terminal register --token _TOKEN_ --server _URL_
You will need to provide a long-lived token _TOKEN_ and the URL of your Home
Assistant instance, _URL_.
Once registered, running Go Hass Agent again with no options should start tracking and sending sensor data to Home Assistant.
If desired, headless mode can be forced, even in graphical environments, by
specifying the --terminal command-line option.
If you want to run Go Hass Agent as a service on a headless machine, see the FAQ.
🐳 Running in a container
There is rough support for running Go Hass Agent within a container. Pre-built images are available for armv6/v7, arm64 and amd64 architectures. The image is based on the latest stable Alpine Linux release.
To register the agent running in a container, run the following:
    podman run --rm --network host \
      --volume go-hass-agent:/home/go-hass-agent:U \
      ghcr.io/joshuar/go-hass-agent:_VERSION_ register \
      --server https://some.server:port \
      --token 'longlivedtoken'
- Change
_VERSION_to a release version. Do not use latest, which is unstable and likely to break. - Change the value of
--serverto your Home Assistant server. - Change the value of
--tokento a long-lived token retrieved from Home Assistant.- Be sure to quote the token to avoid shell escape errors.
- We are running the container in a “one-shot” mode (specifying
--rm) as we just want to register and generate the configuration file. We will use a different command below to actually run Go Hass Agent.
Once registered, run the agent with:
podman run --hostname _HOSTNAME_ --name go-hass-agent \
  --network host \
  --volume go-hass-agent:/home/go-hass-agent:U \
  --volume /proc:/host/proc:ro --volume /sys:/host/sys:ro \
  --env PROCFS_ROOT=/host/proc --env SYSFS_ROOT=/host/sys \
  --volume /run/dbus:/run/dbus:ro \
  --volume /run/user/1000/bus:/run/user/1000/bus:ro \
  --device /dev/video0:/dev/video0
  ghcr.io/joshuar/go-hass-agent:VERSION # add any Go Hass Agent options here.
Change the value passed to --name to a unique name for your running container
and --hostname for the hostname that will be presented to Home Assistant
during registration.
All the other volume mounts are optional, but functionality and the sensors reported will be severely limited without them:
--volume /proc:/host/proc:ro --volume /sys:/host/sys:ro--env PROCFS_ROOT=/host/proc --env SYSFS_ROOT=/host/sys- Enables various hardware and system monitoring sensors.
--volume /run/dbus:/run/dbus:ro--volume /run/user/1000/bus:/run/user/1000/bus:ro- Enables sensors that are gathered via D-Bus. Adjust
1000to the uid of your user.
- Enables sensors that are gathered via D-Bus. Adjust
--device /dev/video0:/dev/video0- Allows webcam control (when configured with MQTT).
🔧 Alternative System Mount Points
Go Hass Agent supports alternative system mount points, which can be especially useful when running in a container. You can set the following environment variables to specify the location Go Hass Agent will use for various mounts:
PROCFS_ROOT: alternative mount point for/proc.DEVFS_ROOT: alternative mount point for/dev.SYSFS_ROOT: alternative mount point for/sys.
When these are set, any sensors that would normally source their data from a file in one of the canonical system mount points, will use the alternative mount point location specified.
For running in a container, example usage would be to add the following command-line arguments to the container run command:
podman run \
  ...other options... \
  --volume /proc:/host/proc:ro --volume /sys:/host/sys:ro --volume /dev:/host/dev:ro \
  --env PROCFS_ROOT=/host/proc --env SYSFS_ROOT=/host/sys --env DEVFS_ROOT=/host/dev \
  ...other options...
🔄 Regular Usage
When running, Go Hass Agent will appear as a device under the Mobile App integration in your Home Assistant instance. It should also report a list of sensors/entities you can use in any automations, scripts, dashboards and other parts of Home Assistant.

🗒️ Preferences
The preferences file (preferences.toml) is located in
CONFIG_HOME/go-hass-agent/ where CONFIG_HOME will OS-dependent:
- Linux:
~/.config. - OSX:
~/Library/Application Support. - Windows:
LocalAppData.
Preferences under [sensors] or [controls] can be used to adjust various
aspects of those sensors/controls, or disable them entirely. See
sensors and controls for mapping
the preferences to individual sensors/controls.
[!WARNING]
Preferences in the other sections should not be edited manually. Editing preferences outside the above two groups may cause Go Hass Agent to stop functioning or produce errors.
🐚 Script Sensors
Go Hass Agent supports utilizing scripts to create sensors. In this way, you can extend the sensors presented to Home Assistant by the agent. Note that as the agent is a “mobile app” in Home Assistant, any script sensors will be associated with the Go Hass Agent device in Home Assistant.
Each script run by the agent can create one or more sensors and each script can run on its own schedule, specified using a Cron syntax.
Requirements
- Scripts need to be put in a
scriptsfolder under the configuration directory (see Preferences Location for the full path). - You can use symlinks, if supported by your Operating System.
- Script files need to be executable by the user running Go Hass Agent.
- Scripts need to run without any user interaction.
- Scripts need to output either valid JSON, YAML or TOML. See Output Format for details.
- Commands do not invoke the system shell and does not support expansion/glob patterns or handle other expansions, pipelines, or redirections typically done by shells.
Supported Scripting Languages
Any typical scripting language that can be invoked with a shebang can be used
for scripts. All scripts do not need to be written in the same language. So or
the typical shells can be used such as bash, sh, zsh, fish, etc. Scripting
languages such as Python, Perl, and Ruby can also be used.
Output Format
All scripts should produce output that is either valid JSON, YAML or TOML. Scripts do not need to use the same format; you can have one script that produces JSON and another that produces TOML. All scripts will need to output the following fields:
- A
schedulefield containing a cron-formatted schedule. - A
sensorsfield containing a list of sensors.
Sensors themselves need to be represented by the following fields:
sensor_name: the friendly name of the sensor in Home Assistant (e.g., My Script Sensor).sensor_icon: a Material Design Icon representing the current state. It can be changed dynamically based on the current state or remain constant. Format ismdi:icon_name.sensor_state: the current value of the sensor. For numerical states, without the units. Otherwise, a string or boolean (for binary sensors).- Note: for a binary sensor, do not enclose the
true/falsein quotes.
- Note: for a binary sensor, do not enclose the
The following optional fields can also be specified, which help control the display in Home Assistant.
sensor_units: the units for the state value.sensor_type: the type of sensor. If this is a binary sensor with a boolean value, set this to “binary”. Else, do not set this field.sensor_device_class: a Home Assistant Device Class for the sensor, which will dictate how it will be displayed in Home Assistant. There are many, pick an appropriate one (seeinternal/hass/sensor/deviceClass.go). If settingsensor_device_class, it is likely required to set an appropriate unit insensor_unitsas well.sensor_state_class: the Home Assistant State Class. Either measurement, total or total_increasing.sensor_attributes: any additional attributes to be displayed with the sensor. Note that the value is required to be valid JSON, regardless of the script output format.
Examples
The following examples show a script that produces two sensors, in different output formats.
JSON
JSON output can be either compressed:
{"schedule":"@every 5s","sensors":[{"sensor_name": "random 1","sensor_icon": "mdi:dice-1","sensor_state":1},{"sensor_name": "random 2","sensor_icon": "mdi:dice-2","sensor_state_class":"measurement","sensor_state":6}]}
Or pretty-printed:
{
  "schedule": "@every 5s",
  "sensors": [
    {
      "sensor_name": "random 1",
      "sensor_icon": "mdi:dice-1",
      "sensor_state": 2
    },
    {
      "sensor_name": "random 2",
      "sensor_icon": "mdi:dice-2",
      "sensor_state_class": "measurement",
      "sensor_state": 6
    }
  ]
}
YAML
schedule: '@every 5s'
sensors:
    - sensor_name: random 1
      sensor_icon: mdi:dice-1
      sensor_state: 8
    - sensor_name: random 2
      sensor_icon: mdi:dice-2
      sensor_state_class: measurement
      sensor_state: 9
TOML
schedule = '@every 5s'

[[sensors]]
sensor_icon = 'mdi:dice-1'
sensor_name = 'random 1'
sensor_state = 3

[[sensors]]
sensor_icon = 'mdi:dice-2'
sensor_name = 'random 2'
sensor_state = 3
sensor_state_class = 'measurement'
For a binary sensor, the output should have sensor_type set to “binary” and
the sensor_state as true or false (without quotes). As an example in
compressed JSON format:
{"schedule":"@every 10s","sensors":[{"sensor_name":"random 4","sensor_type":"binary","sensor_icon":"mdi:dice-3","sensor_state":false}]}
Schedule
The schedule field is used to specify the schedule or interval on which the
script will be run by the agent. Each script is run on its own schedule. All
sensors and their values should be returned each time the script is run. The
format is documented by the cron Golang
package.
In most cases, it is presumed that the script needs to be run on some interval
of time. In that case, the easiest way to specify that is with the @every <duration> as per the example output such as:
@every 5s: every 5 seconds@every 1h30m: every 1 and a half hours.
Or a pre-defined schedule:
@hourly.@daily.@weekly.@monthly.@yearly.
However, more cron formats are supported:
"30 * * * *": every hour on the half hour."30 3-6,20-23 * * *": in the range 3-6am, 8-11pm."CRON_TZ=Asia/Tokyo 30 04 * * *": at 04:30 Tokyo time every day.
[!NOTE]
Some schedules, while supported, might not make much sense.
Security Implications
Running scripts can be dangerous, especially if the script does not have robust error-handling or whose origin is untrusted or unknown. Go Hass Agent makes no attempt to do any analysis or sanitization of script output, other than ensuring the output is a supported format. As such, ensure you trust and understand what the script does and all possible outputs that the script can produce. Scripts are run by the agent and have the permissions of the user running the agent. Script output is sent to your Home Assistant instance.
💬 MQTT Sensors and Controls
[!NOTE]
- MQTT Sensors and Controls are not enabled by default.
- Go Hass Agent requires MQTT v5 support on your MQTT broker.
If Home Assistant is connected to MQTT, you can also configure Go Hass Agent to connect to MQTT, which will then expose some sensors and controls in Home Assistant to control the device running the agent. Additionally, you can configure your own custom controls to run either D-Bus commands or scripts and executables.
Configuration
To configure the agent to connect to MQTT:
-
Right-click on the Go Hass Agent tray icon.
-
Select App Settings.
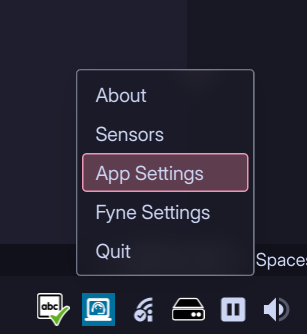
-
Toggle Use MQTT and then enter the details for your MQTT server (not your Home Assistant server).
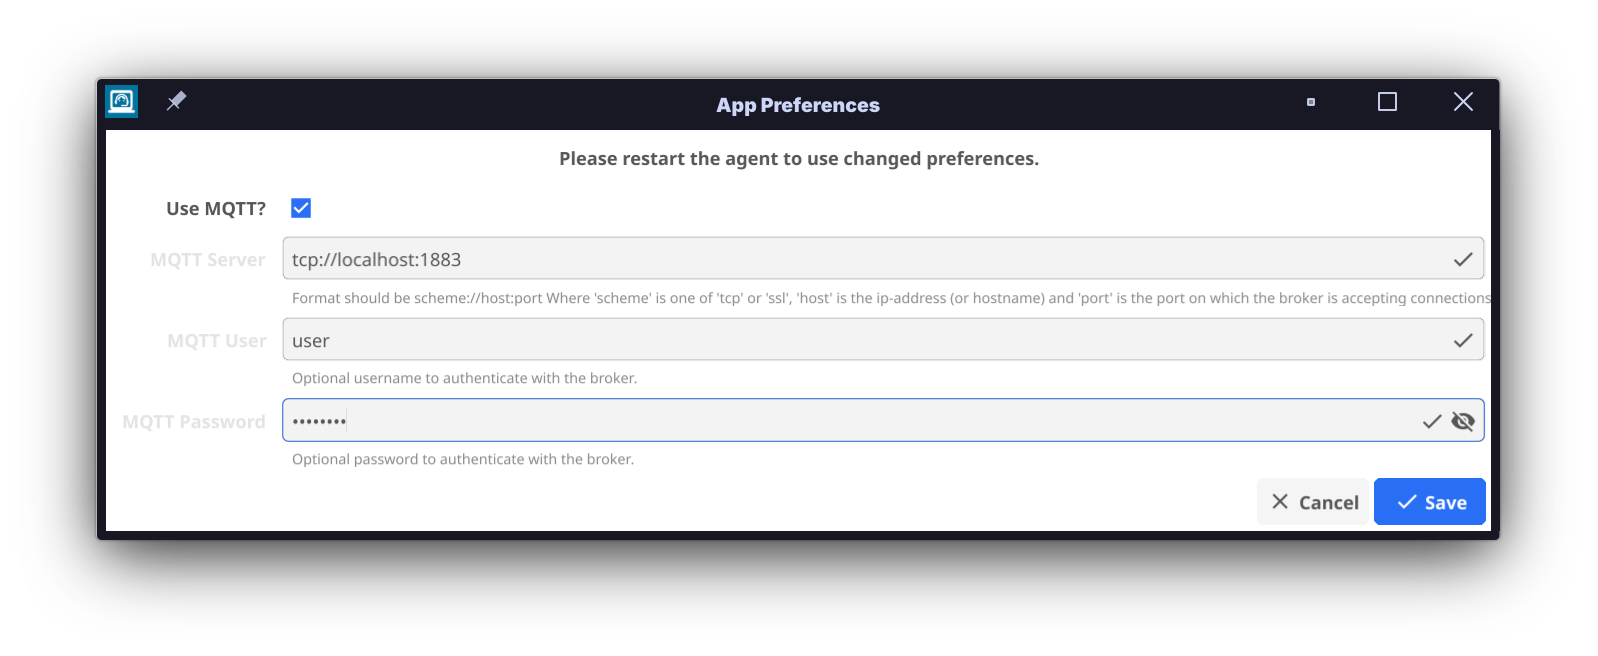
-
Click Save.
-
Restart Go Hass Agent.
For users running Go Hass Agent in headless mode.
-
Stop Go Hass Agent if running.
-
Use the
configcommand option to specify your MQTT server parameters:go-hass-agent config --mqtt-server=tcp://localhost:1883 --mqtt-user=some-user --mqtt-password=superseret- Only
--mqtt-serveris required.
- Only
-
Restart Go Hass Agent.
After the above steps, Go Hass Agent will appear as a device under the MQTT integration in your Home Assistant.
[!NOTE]
Go Hass Agent will appear in two places in your Home Assistant. Firstly, under the Mobile App integration, which will show all the sensors that Go Hass Agent is reporting. Secondly, under the MQTT integration, which will show the controls and sensors exposed over MQTT for Go Hass Agent. Unfortunately, due to limitations with the Home Assistant architecture, these cannot be combined in a single place.
Custom D-Bus Controls
When MQTT is configured, Go Hass Agent will also listen on MQTT and run arbitrary D-Bus commands.
The agent will subscribe to the MQTT topic gohassagent/HOSTNAME/dbuscommand
(where HOSTNAME is the short hostname of the device running Go Hass Agent) on
the configured MQTT broker and listens for messages with a JSON payload (shown
below) that contains details of the D-Bus method to call. When a message is
received, the method will be executed. The easiest way to use this feature is
with the mqtt.publish service in Home Assistant.
As an example, the following will create a notification on the device running Go Hass Agent (YAML format used for readability):
service: mqtt.publish
data:
  qos: 0
  topic: gohassagent/HOSTNAME/dbuscommand
  payload: |
    {
      "bus": "session",
      "path": "/org/freedesktop/Notifications",
      "method": "org.freedesktop.Notifications.Notify",
      "destination": "org.freedesktop.Notifications",
      "args": [
          "my-app-name",
          0,
          "my-icon",
          "summary",
          "body",
          [],
          {},
          5000
      ],
      "use_session_path": false
    }
Other Custom Commands
You can optionally create a commands.toml file under the configuration
directory (see preferences with custom
commands to be exposed in Home Assistant.
Supported control types and expected input/output:
- Button.
- Output is discarded. Return value is used to indicate success/failure.
- Switch.
- Return value is used to indicate success/failure.
- When the switch is toggled in Home Assistant, Go Hass Agent will run the configured command with an “ON” or “OFF” appended to the end of its command-line.
- When the configured command is run, it should output the current state as “ON” or “OFF”. Any additional output is ignored and any output that doesn't match these strings will indicate an error to the agent.
- Number.
displaycan be optionally set in the control configuration to specify how the number control will be displayed in Home Assistant:- Either
auto,boxorslider. The default ifdisplayis not set isauto, where Home Assistant will decide how the control will be displayed.
- Either
typecan be optionally set in the control configuration to specify whether the number control hasintorfloatvalues. The default will beintif omitted.- Return value is used to indicate success/failure.
- When the number is changed in Home Assistant, Go Hass Agent will run the configured command passing the value appended to the end of its command-line.
- When the configured command is run, it should output a number as the current state. Any additional output is ignored.
[!NOTE]
Commands run as the user running the agent. Commands do not invoke the system shell and does not support expansion/glob patterns or handle other expansions, pipelines, or redirections typically done by shells.
States are not kept in sync. This is most important for all controls besides buttons. For example, if you configure a switch, any changes to the state you make outside of Home Assistant will not be reflected in Home Assistant automatically.
Each command needs the following definition in the file:
# "control" should be replaced with one of the control types above.
[[control]]
# name is required.
# The pretty name of the command that will be the label in Home Assistant.
name = "my command name"
# exec is required.
# The path to the command to execute.
# Arguments can be given as required, and should be quoted if they contain spaces.
exec = '/path/to/command arg1 "arg with space"'
# icon is optional.
# The material design icon to use to represent the control in Home Assistant.
# See https://pictogrammers.com/library/mdi/ for icons you can use.
icon = "mdi:something"
# display is optional and only relevant for certain controls.
# How the control will be shown in Home Assistant. Refer to the control type for valid values.
display = "displayValue"
For number controls, additional configuration may be specified (default values shown):
# type is optional.
# Whether this number control has int or float values. Default is "int".
type = "int"
# min is optional.
# The minimum value of the number. Default is 0.
min = 0
# max is optional.
# The maximum value of the number. Default is 100.
max = 100
# step is optional.
# The amount to change the value by (i.e., increment/decrement), if applicable. Default is 1.
step = 1
The following shows an example that configures various controls in Home Assistant:
  [[button]]
  name = "My Command With an Icon"
  exec = 'command arg1 arg2 "arg3"'
  icon = "mdi:chat"

  [[button]]
  name = "My Command"
  exec = "command"

  [[switch]]
  name = "Toggle a Thing"
  exec = "command arg1 arg2"

  [[number]]
  name = "My number slider"
  exec = "command"
  display = "slider"
  min = 1
  max = 500
  step = 5
Security Implications
There is a significant discrepancy in permissions between the device running Go Hass Agent and Home Assistant.
Go Hass Agent runs under a user account on a device. So the above controls will only work where that user has permissions to run the underlying actions on that device. Home Assistant does not currently offer any fine-grained access control for controls like the above. So any Home Assistant user will be able to run any of the controls. This means that a Home Assistant user not associated with the device user running the agent can use the exposed controls to issue potentially disruptive actions on a device that another user is accessing.
⚙️ Building/Compiling Manually
Build Requirements
Go Hass Agent uses Mage for development.
Compiling
Use the following mage invocation in the project root directory:
go run github.com/magefile/mage -d build/magefiles -w . build:full
This will build a binary and place it in dist/go-hass-agent-amd64.
Cross Compilation
Go Hass Agent can also be built for arm (v6/v7) and arm64 with
cross-compilation. This is only supported on Ubuntu or Alpine Linux as the
host for cross-compiles. To build for a different architecture, set the
TARGETPLATFORM environment variable:
export TARGETPLATFORM=linux/arm64 # or linux/arm/v6 or linux/arm/v7
Install the target architecture libraries for cross-compilation:
go run github.com/magefile/mage -d build/magefiles -w . preps:deps
Then the commands for building and packaging above should work as expected.
[!NOTE]
The devcontainer has all the necessary compilers and libraries installed for cross-compilation.
Packages
Go Hass Agent uses nfpm to create packages for Fedora, Arch, and Ubuntu/Debian.
To build packages, use the following invocations:
go run github.com/magefile/mage -d build/magefiles -w . package:nfpm
The above mage actions will install the necessary tooling for packaging, if needed.
- Packages will be available under the
dist/folder. - You can build packages for other architectures as well by following the guide for cross-compliation.
Container Images
A Dockerfile that you can use to build an image can be found here.
You can build an image with a command like the following (using Podman):
podman build --file ./Dockerfile --tag go-hass-agent
As with building a binary, cross-compliation is supported:
# use either linux/arm64, linux/arm/v7 or linux/arm/v6
podman build --file ./Dockerfile --platform linux/arm/v7 --tag go-hass-agent
[!NOTE]
By default, the container will run as a user with UID/GID 1000/1000. You can pick a different UID/GID when building by adding
--build-arg UID=999and--build-arg GID=999(adjusting the values as appropriate).
👋 Contributing
- Found an issue? Please report it!
- Have a suggestion for a feature? Want a particular sensor/measurement added? Submit a feature request!
- Want to help develop Go Hass Agent? See the contributing guidelines.
[!NOTE]
Please note, as an open-source and hobby project, the Go Hass Agent developers cannot commit to a response within any given time-frame. However, we do endeavor to try to provide an initial response, and ongoing cadence of 1 week.
💾 Committing Code
This repository is using conventional commit messages. This provides the ability to automatically include relevant notes in the changelog. The TL;DR is when writing commit messages, add a prefix:
feat:for a new feature, like a new sensor.fix:when fixing an issue.refactor:when making non-visible but useful code changes.- …and so on. See the link above or see the existing commit messages for examples.
📜 Code of Conduct
Please read the Code of Conduct
🧭 Roadmap
Check out what I'm working on for future releases.
❔ FAQ
Can I change the units of the sensor?
- Yes! In the customization options for a sensor/entity, you can change the unit of measurement (and display precision if desired). This is useful for sensors whose native unit is not very human-friendly. For example the memory sensors report values in bytes (B), whereas you may wish to change the unit of measurement to gigabytes (GB).
Can I disable some sensors?
- There is currently some limited support for disabling certain groups of
sensors. In the preferences, under the
workersections, you can find some controls to disable some sensor groups. - Alternatively, you can disable the corresponding sensor entity in Home Assistant,
and the agent will stop sending updates for it.
- To disable a sensor entity, In the customisation options for a sensor/entity, toggle the Enabled switch. The agent will automatically detect the disabled state and send/not send updates as appropriate.
- Note that disabling a sensor in Home Assistant will not stop Go Hass Agent from gathering the raw data for the sensor. Only disabling it via the Agent preferences file will stop any data gathering.
The GUI windows are too small/too big. How can I change the size?
- See Scaling in the Fyne documentation. In the tray icon menu, select Settings to open the Fyne settings app which can adjust the scaling for the app windows.
What is the resource (CPU, memory) usage of the agent?
- Very little in most cases. On Linux, the agent with all sensors working,
should consume well less than 50 MB of memory with very little CPU usage.
Further memory savings can be achieved by running the agent in “headless” mode
with the
--terminalcommand-line option. This should put the memory usage below 25 MB. - On Linux, many sensors rely on D-Bus signals for publishing their data, so CPU usage may be affected by the “business” of the bus. For sensors that are polled on an interval, the agent makes use of some jitter in the polling intervals to avoid a “thundering herd” problem.
I've updated the agent and now I've got a bunch of duplicate/removed/disabled sensors?
-
Generally, Go Hass Agent will try to reserve sensor renames to major version upgrades, which may contain breaking changes.
-
Unfortunately, sometimes sensor names may inadvertently get changed in non-major releases.
-
Regrettably, there is no way to rename the sensors in Home Assistant such that long-term statistics and existing automations and dashboards continue to work uninterrupted.
-
For long-term statistics, you can remove the old sensors manually, under Developer Tools→Statistics in Home Assistant, for example. The list should contain sensors that are no longer “provided” by the agent. Or you can wait until they age out of the Home Assistant long-term statistics database automatically.
-
For automations and dashboards the repairs integration, will direct you to any broken items and how to fix them.

Can I reset the agent (start from new)?
- Yes. You can reset the agent so that it will re-register with Home Assistant and act as a new device. To do this:
-
Stop Go Hass Agent if already running.
-
Open your Home Assistant mobile_app integrations page:
-
Locate the entry for your existing Go Hass Agent device. It should be named the same as the hostname of the device it is running on.
-
Click on the menu (three vertical dots) at the right of the entry:
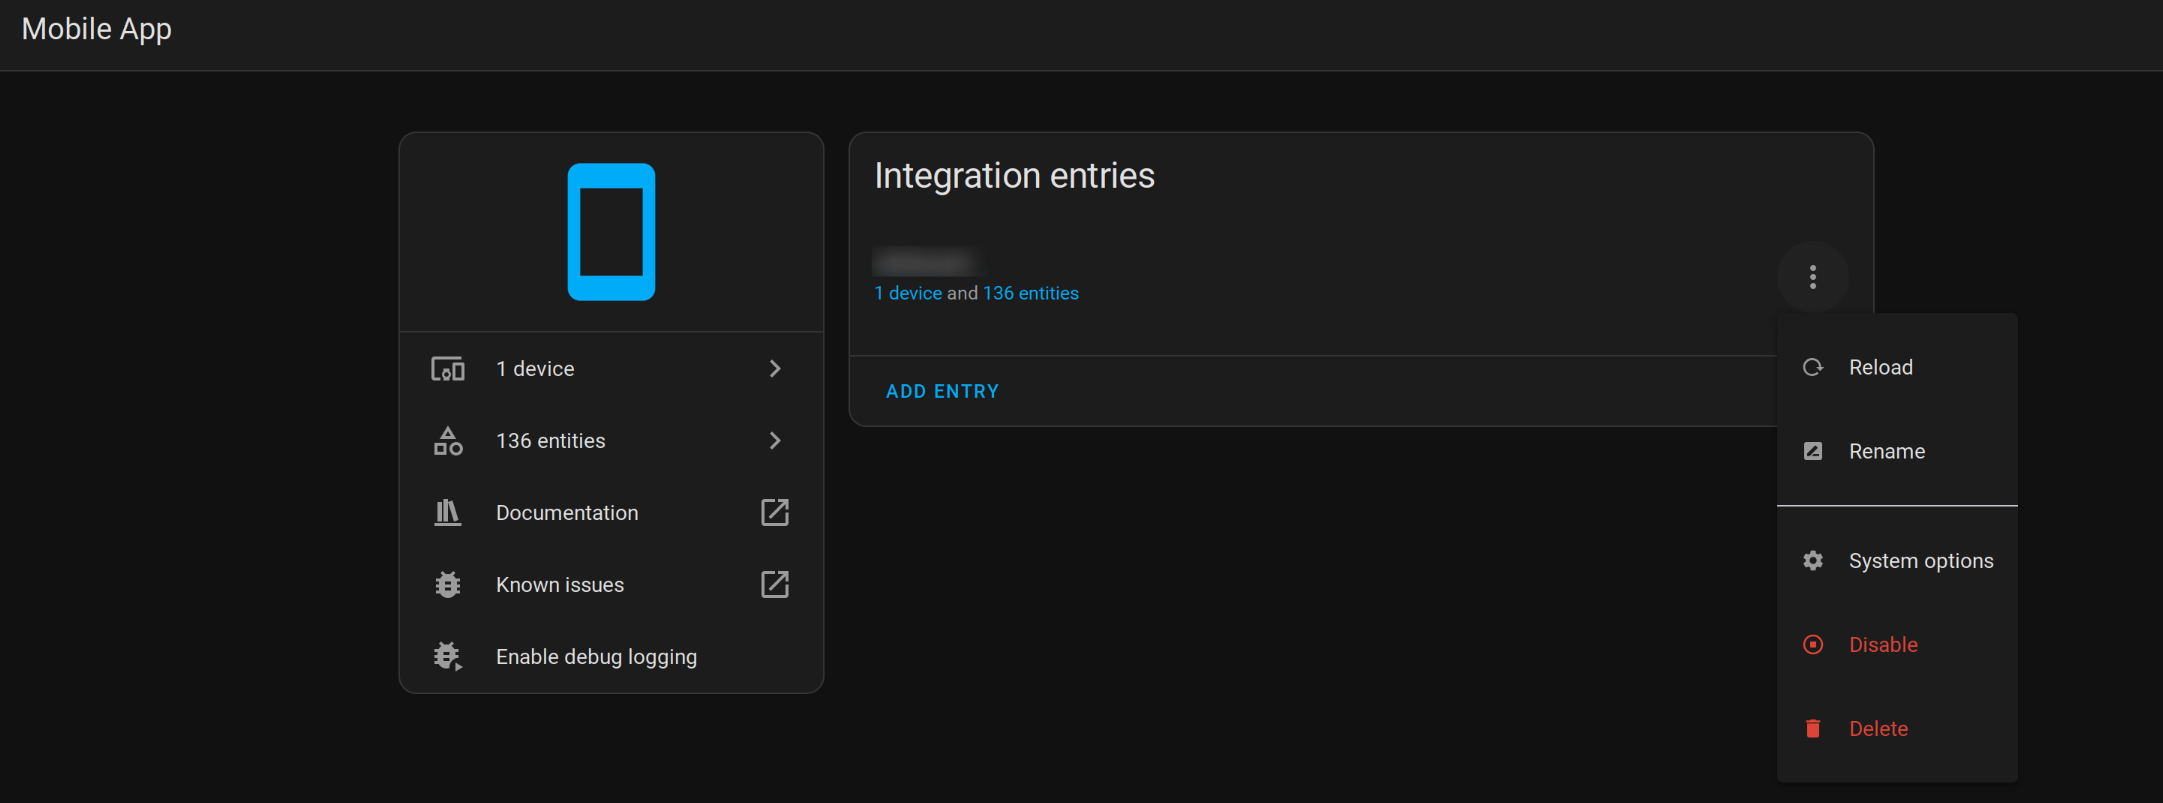
-
Choose Delete.
-
From a terminal, run the agent with the command:
go-hass-agent register --force(add--terminal --server someserver --token sometokenfor non-graphical registration). -
The agent will go through the initial registration steps. It should report that registration was successful.
-
Restart the agent.
Can (or does) the agent run as root or with privileges?
- No. None of the built-in sensors (or commands if MQTT has been enabled) require any privileges. The agent will refuse to run if it is started with privileges.
- If you have script sensors or custom commands that need privileges, there are most likely ways for the script/command to elevate to the privileges it needs as part of its execution.
Can the agent run in an MQTT-only mode?
- Unfortunately no, Go Hass Agent cannot run in an MQTT-only credentials. It makes use of the Native App Integration API that is not MQTT only.
(Linux) I want to run the agent on a server, as a service, without a GUI. Can I do this?
- Yes. The packages install a systemd service file that can be enabled and used to run the agent as a service.
- You will still need to register the agent manually before starting as a service. See the command for registration in the README.
- You will also need to ensure your user has “lingering” enabled. Run
loginctl list-usersand check that your user hasLINGERset to “yes”. If not, runloginctl enable-linger. - Once you have registered the agent and enabled lingering for your user. Enable
the service and start it with the command:
systemctl --user enable go-hass-agent && systemctl --user start go-hass-agent. - You can check the status with
systemctl --user status go-hass-agent. The agent should start with every boot. - For other init systems, consult their documentation on how to enable and run user services.
(Linux) Why do the disk rate sensors report a non-zero value while the IO operations in progress sensor is zero?
- The rate sensors are a derived value, taken by looking at the change in total IO operations since the sensor was last polled. The IO operations in progress sensor is a point-in-time measurement taken at the time of polling. So short-lived IO operations, that generate reads/writes but happen between polling intervals, won't be visible in the IO operations sensor but will contribute to the derived IO rate sensors.
- If you are wanting to track IO operations, I would recommend focusing on the IO operations value being at a certain value over a period of time. Certainly however, for exact measurements, a dedicated monitoring solution is recommended.
(Linux) What does the value of the Firmware Security sensor mean?
- This is a Host Security ID value. More information can be found here.
(Linux) Some of the hardware sensors are reporting incorrect values?
- Go Hass Agent sends the raw hardware sensor data without any chip-dependent
scaling/transformation. If you are comparing the values to, say, the output of
sensors from the
sensorscommand (part of lm-sensors), there will be discrepancies; lm-sensors has a database of chips with scaling/transformation information for their values and applies those as required before displaying the values. - Future versions of Go Hass Agent will hopefully use similar logic to scale/transform the hardware sensor values. As a workaround, you can create a template sensor that scales/transforms values as appropriate.
🤝 Acknowledgements
- Home Assistant, for providing a platform to watch and act on sensors and stuff.
- Mage, used to make building Go Hass Agent easier.
- This Awesome README Template, to create this awesome README.
- Prometheus Node Exporter code, for inspiration on some sensors.